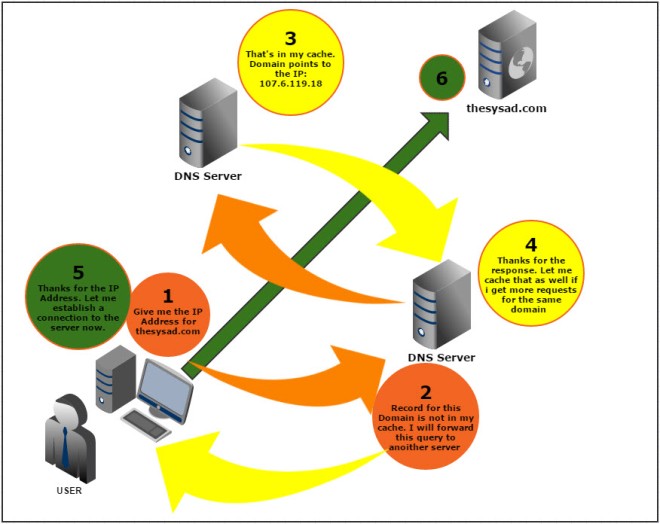
BIND is open source software that implements the Domain Name System (DNS) protocols for the Internet which provides ability to perform name to ip conversion. The name BIND stands for “Berkeley Internet Name Domain”, because the software originated in the early 1980s at the University of California at Berkeley. BIND is by far the most widely used DNS software on the Internet, providing a robust and stable platform on top of which organizations can build distributed computing systems with the knowledge that those systems are fully compliant with published DNS standards.

Prerequisites
- Updated minimal working CentOS 7 Server with root credentials,
- Setup its FQDN,
- Configure required Basic Networking Setup that connects to the Internet.
DNS Server Details:
Operating System     : CentOS 7 minimal server
Hostname             : test.com
IP Address           : 192.168.4.9/24
Installing BIND9 on CentOS 7
BIND package can directly be installed using the ‘yum’ command.
# yum install bind bind-utils -y
1. Configure DNS Server
Edit ‘/etc/named.conf’ file.
# vi /etc/named.conf
Add the lines as shown in bold:
 //
 // named.conf
 //
 // Provided by Red Hat bind package to configure the ISC BIND named(8) DNS
 // server as a caching only nameserver (as a localhost DNS resolver only).
 //
 // See /usr/share/doc/bind*/sample/ for example named configuration files.
 //
 // See the BIND Administrator's Reference Manual (ARM) for details about the
 // configuration located in /usr/share/doc/bind-{version}/Bv9ARM.htmloptions {
 listen-on port 53 { 127.0.0.1;192.168.4.9; }; ### Master DNS IP ###
 #  listen-on-v6 port 53 { ::1; };
 directory     "/var/named";
 dump-file     "/var/named/data/cache_dump.db";
 statistics-file "/var/named/data/named_stats.txt";
 memstatistics-file "/var/named/data/named_mem_stats.txt";
 allow-query     { localhost;192.168.4.0/27; };           ### Define IP Range ###
 allow-transfer{ 8.8.8.8; localhost; 192.168.1.102; };       ### Slave DNS IP ###
 forwarders { 8.8.8.8; 8.8.4.4; };       # Forwards DNS quries to Google DNS Server #
/*
- If you are building an AUTHORITATIVE DNS server, do NOT enable recursion.
- If you are building a RECURSIVE (caching) DNS server, you need to enable
recursion.
- If your recursive DNS server has a public IP address, you MUST enable access
control to limit queries to your legitimate users. Failing to do so will
cause your server to become part of large scale DNS amplification
attacks. Implementing BCP38 within your network would greatly
reduce such attack surface
*/
recursion yes;

dnssec-enable yes;
dnssec-validation yes;

/* Path to ISC DLV key */
bindkeys-file "/etc/named.iscdlv.key";

managed-keys-directory "/var/named/dynamic";

pid-file "/run/named/named.pid";
session-keyfile "/run/named/session.key";
};

logging {
channel default_debug {
file "data/named.run";
severity dynamic;
};
};

zone "." IN {
type hint;
file "named.ca";
};

zone "test.com" IN {
        type master;
        file "test.com.ca";
};

include "/etc/named.rfc1912.zones";
include "/etc/named.root.key";
2. Create Zone files
# vi /var/named/test.com.ca
Add the following lines:
$TTL    86400
 @               IN SOA  @       root (
                                42              ; serial (d. adams)
                                3H              ; refresh
                                15M             ; retry
                                1W              ; expiry
                                1D )            ; minimum
                            IN NS           @
                            IN A            192.168.4.9
 www1                       IN A            192.168.4.9
 www                        IN A            192.168.4.9
 test                       IN A            192.168.4.9
 nepalisupport              IN A            192.168.4.9
3. Start the DNS service
Enable and start DNS service:
# systemctl enable named
# systemctl start named
4. Firewall Configuration
We must allow the DNS service default port 53 through firewall.
# firewall-cmd --permanent --add-port=53/tcp
# firewall-cmd --permanent --add-port=53/udp
5. Restart Firewall
# firewall-cmd --reload
6. Configuring Permissions, Ownership, and SELinux
Run the following commands one by one:
# chgrp named -R /var/named# chown -v root:named /etc/named.confrestorecon -rv /var/namedrestorecon /etc/named.conf
7. Test DNS configuration and zone files for any syntax errors
Check DNS default configuration file:
# named-checkconf /etc/named.conf
If it returns nothing, your configuration file is valid.
Check Forward zone:
# named-checkzone local /var/named/test.com.ca
Sample output:
zone local/IN: loaded serial 2011071001
OK
Now add the DNS Server details in your network interface config file.
# vi /etc/sysconfig/network-scripts/ifcfg-enp0s3
TYPE="Ethernet"
BOOTPROTO="none"
DEFROUTE="yes"
IPV4_FAILURE_FATAL="no"
IPV6INIT="yes"
IPV6_AUTOCONF="yes"
IPV6_DEFROUTE="yes"
IPV6_FAILURE_FATAL="no"
NAME="enp0s3"
UUID="5d0428b3-6af2-4f6b-9fe3-4250cd839efa"
ONBOOT="yes"
HWADDR="08:00:27:19:68:73"
IPADDR0="192.168.4.9"
PREFIX0="24"
GATEWAY0="192.168.4.1"
DNS="192.168.4.9"
IPV6_PEERDNS="yes"
IPV6_PEERROUTES="yes"
Edit file /etc/resolv.conf,
# vi /etc/resolv.conf
Add the name server ip address:
nameserver 192.168.4.9
Save and close the file.
Restart network service:
# systemctl restart network
8. Test DNS Server
# dig www.test.com
Sample Output:
; <<>> DiG 9.9.4-RedHat-9.9.4-14.el7 <<>> masterdns.local
;; global options: +cmd
;; Got answer:
;; ->>HEADER<
# nslookup www.test.com
Sample Output:
Server:        192.168.4.9
Address:    192.168.4.9#53

Name:    test.com
Address: 192.168.4.9
Client Side Configuration
If Client has a Linux Operating System,
Add the DNS server details in ‘/etc/resolv.conf’ file in all client systems
# vi /etc/resolv.conf
nameserver 192.168.4.9
Restart network service or reboot the system.
Test DNS Server
Now, you can test the DNS server using any one of the following commands:
# dig www.test.com
If Client has a Windows Operating System,
Add DNS server details in ipv4 Network settings and browse in the address bar.
That’s it. Now you have successfully configured a DNS Server on your CentOS 7 Machine.
Thank you.
For more reading materials please click here

Add what lines?
LikeLike
Sorry, I did not get you…
LikeLike